Quick Start
Get up and running with Gopher in 5 minutes.
Prerequisites
Before you begin:
- Install Gopher - Download from macOS, Windows, or CLI
- Get an API Key - You'll need an LLM API key (see below)
Step 1: Get API Access
Gopher uses AI models to generate and evaluate trading strategies. Choose one of these options:
Option A: Gopher Credits (Easiest)
Use Gopher's hosted inference service - no external API keys needed:
- Go to gotrader.gopher-ai.com/settings
- Create an account or sign in
- Purchase credits or use your existing balance
- Copy your Gopher Key (starts with
gopher_)
Option B: Bring Your Own API Key
Use your own API key from a provider:
| Provider | Description | Get Key |
|---|---|---|
| OpenRouter | Access to 100+ models | openrouter.ai/keys |
| OpenAI | GPT-4, GPT-4o models | platform.openai.com/api-keys |
| Basilica | OpenAI-compatible deployment URL | docs.basilica.ai |
Gopher Credits are recommended for simplicity - inference is handled automatically with optimized models.
Step 2: Configure Gopher
Desktop App
- Launch Gopher from your Applications folder (macOS) or Start menu (Windows)
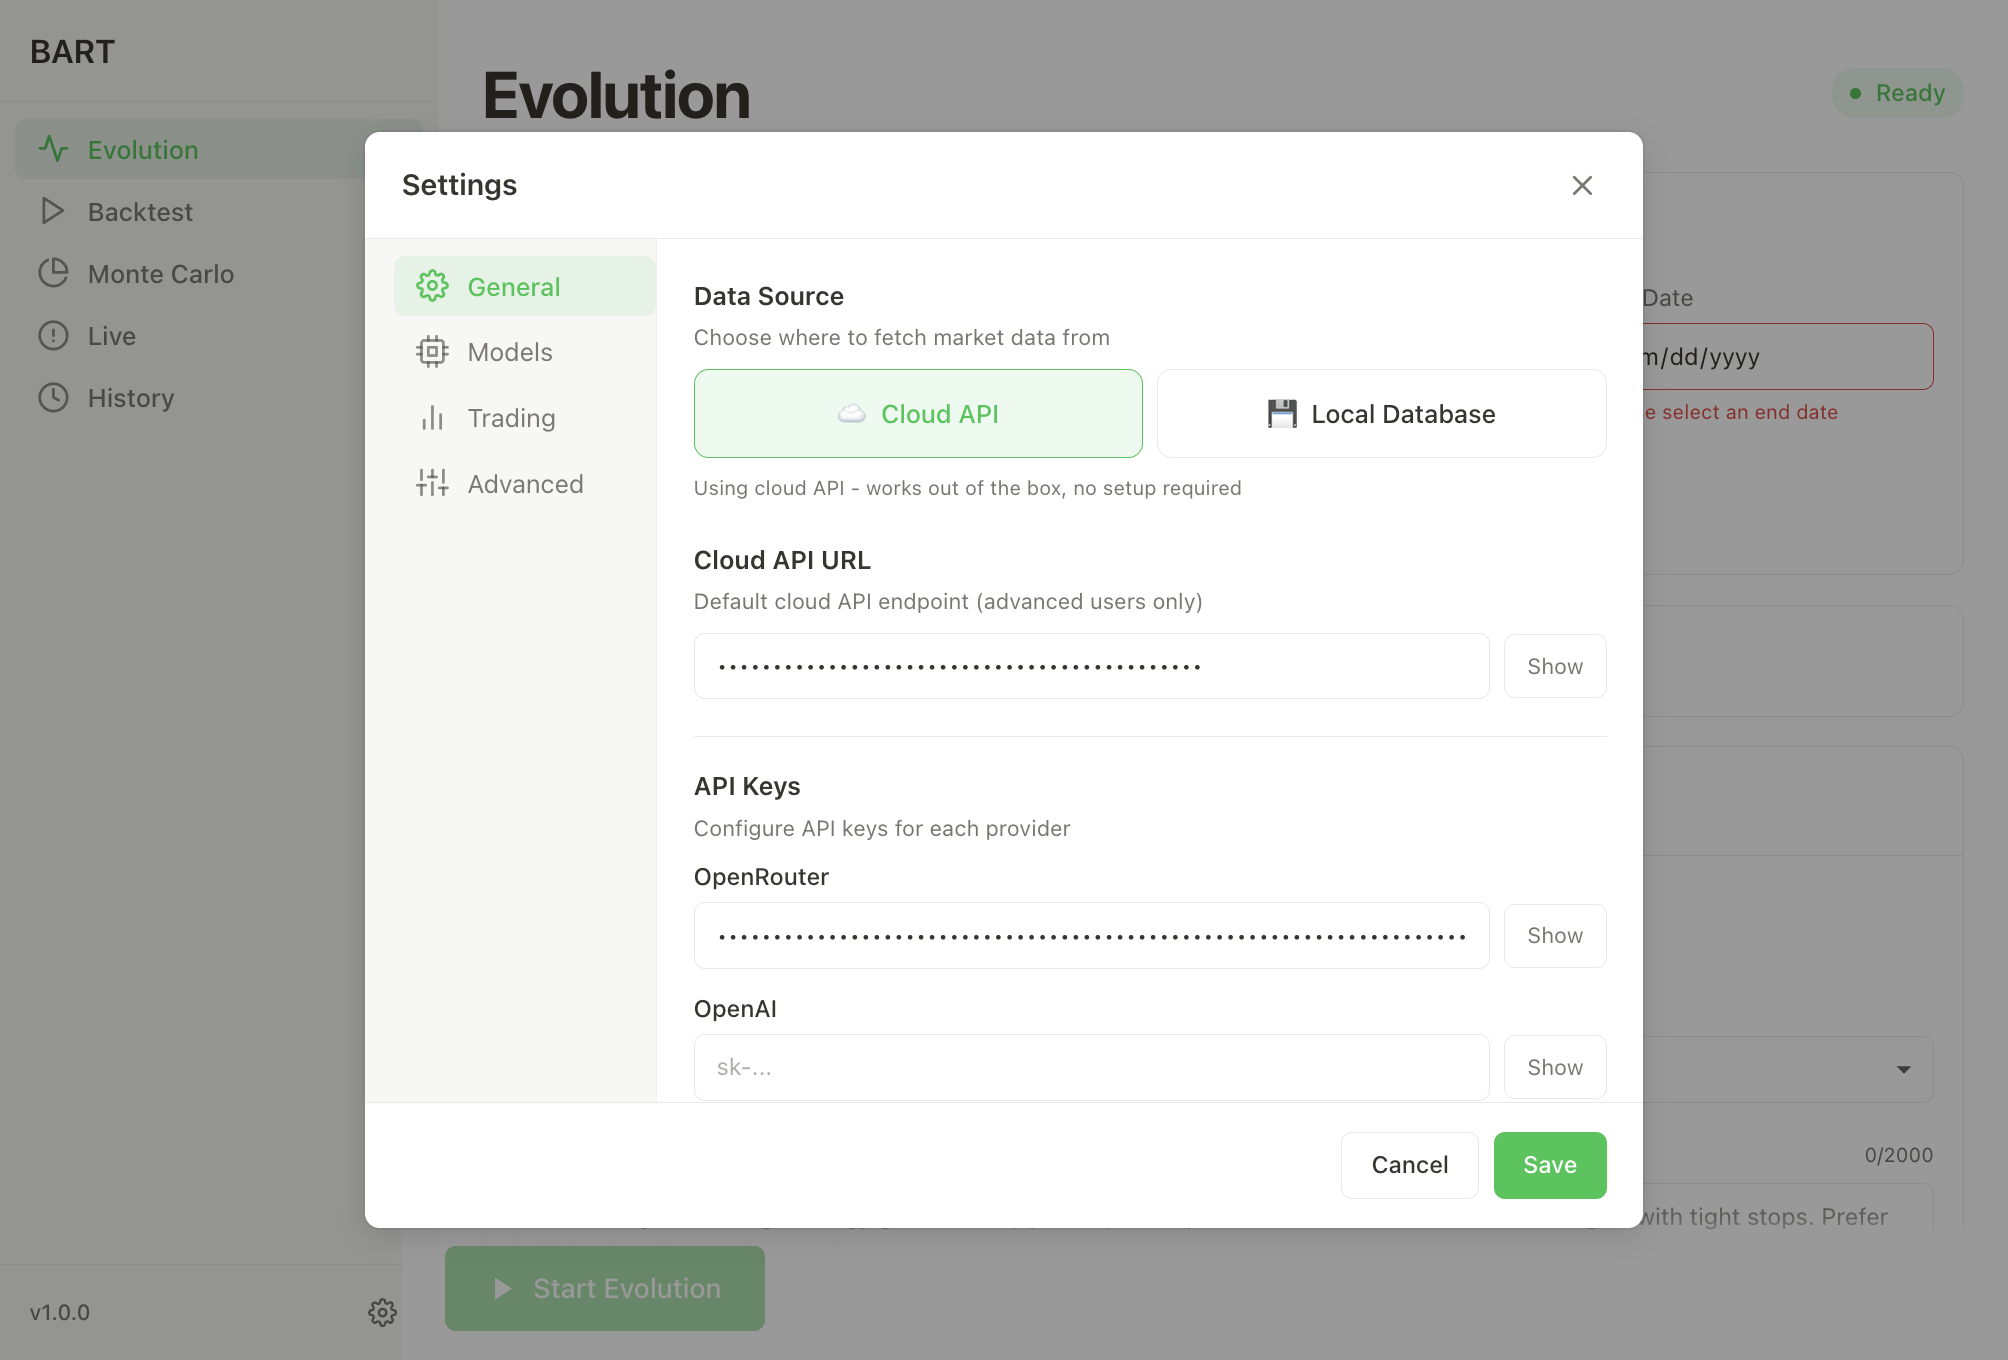
- Click the Settings icon (gear) in the sidebar
- Under General, enter your credentials:
- For Gopher Credits: Paste your Gopher Key in the Gopher Key field
- For OpenRouter: Paste in the OpenRouter API Key field
- For OpenAI: Paste in the OpenAI API Key field
- For Basilica: Add a custom model with base URL
${DEPLOYMENT_URL}/v1and API keynot-needed
- Click Test to verify the connection
- A green checkmark indicates success
Advanced users can set per-loop inference overrides in Settings → Advanced → Inference Overrides.
CLI
Run the interactive setup wizard:
gopher setup
The wizard guides you through all configuration options interactively.
Alternatively, set environment variables directly:
# Gopher Credits (recommended)
export BART_GOPHER_CODE='gopher_your-key-here'

# Or OpenRouter
export OPENROUTER_API_KEY='sk-or-v1-your-key-here'

# Or OpenAI
export OPENAI_API_KEY='sk-your-key-here'
Step 3: Select Models
In Settings > Models, select:
| Setting | Recommended | Purpose |
|---|---|---|
| Loop Model | qwen/qwen3-max | Primary model for strategy generation/evolution |
| Backtest Model | qwen/qwen3-vl-8b-instruct | Faster model for trade decisions |
The defaults work well for most users.
Step 4: Run Strategy Evolution
The main feature of Gopher is autonomous strategy evolution - an AI-powered process that iteratively discovers and refines trading strategies.
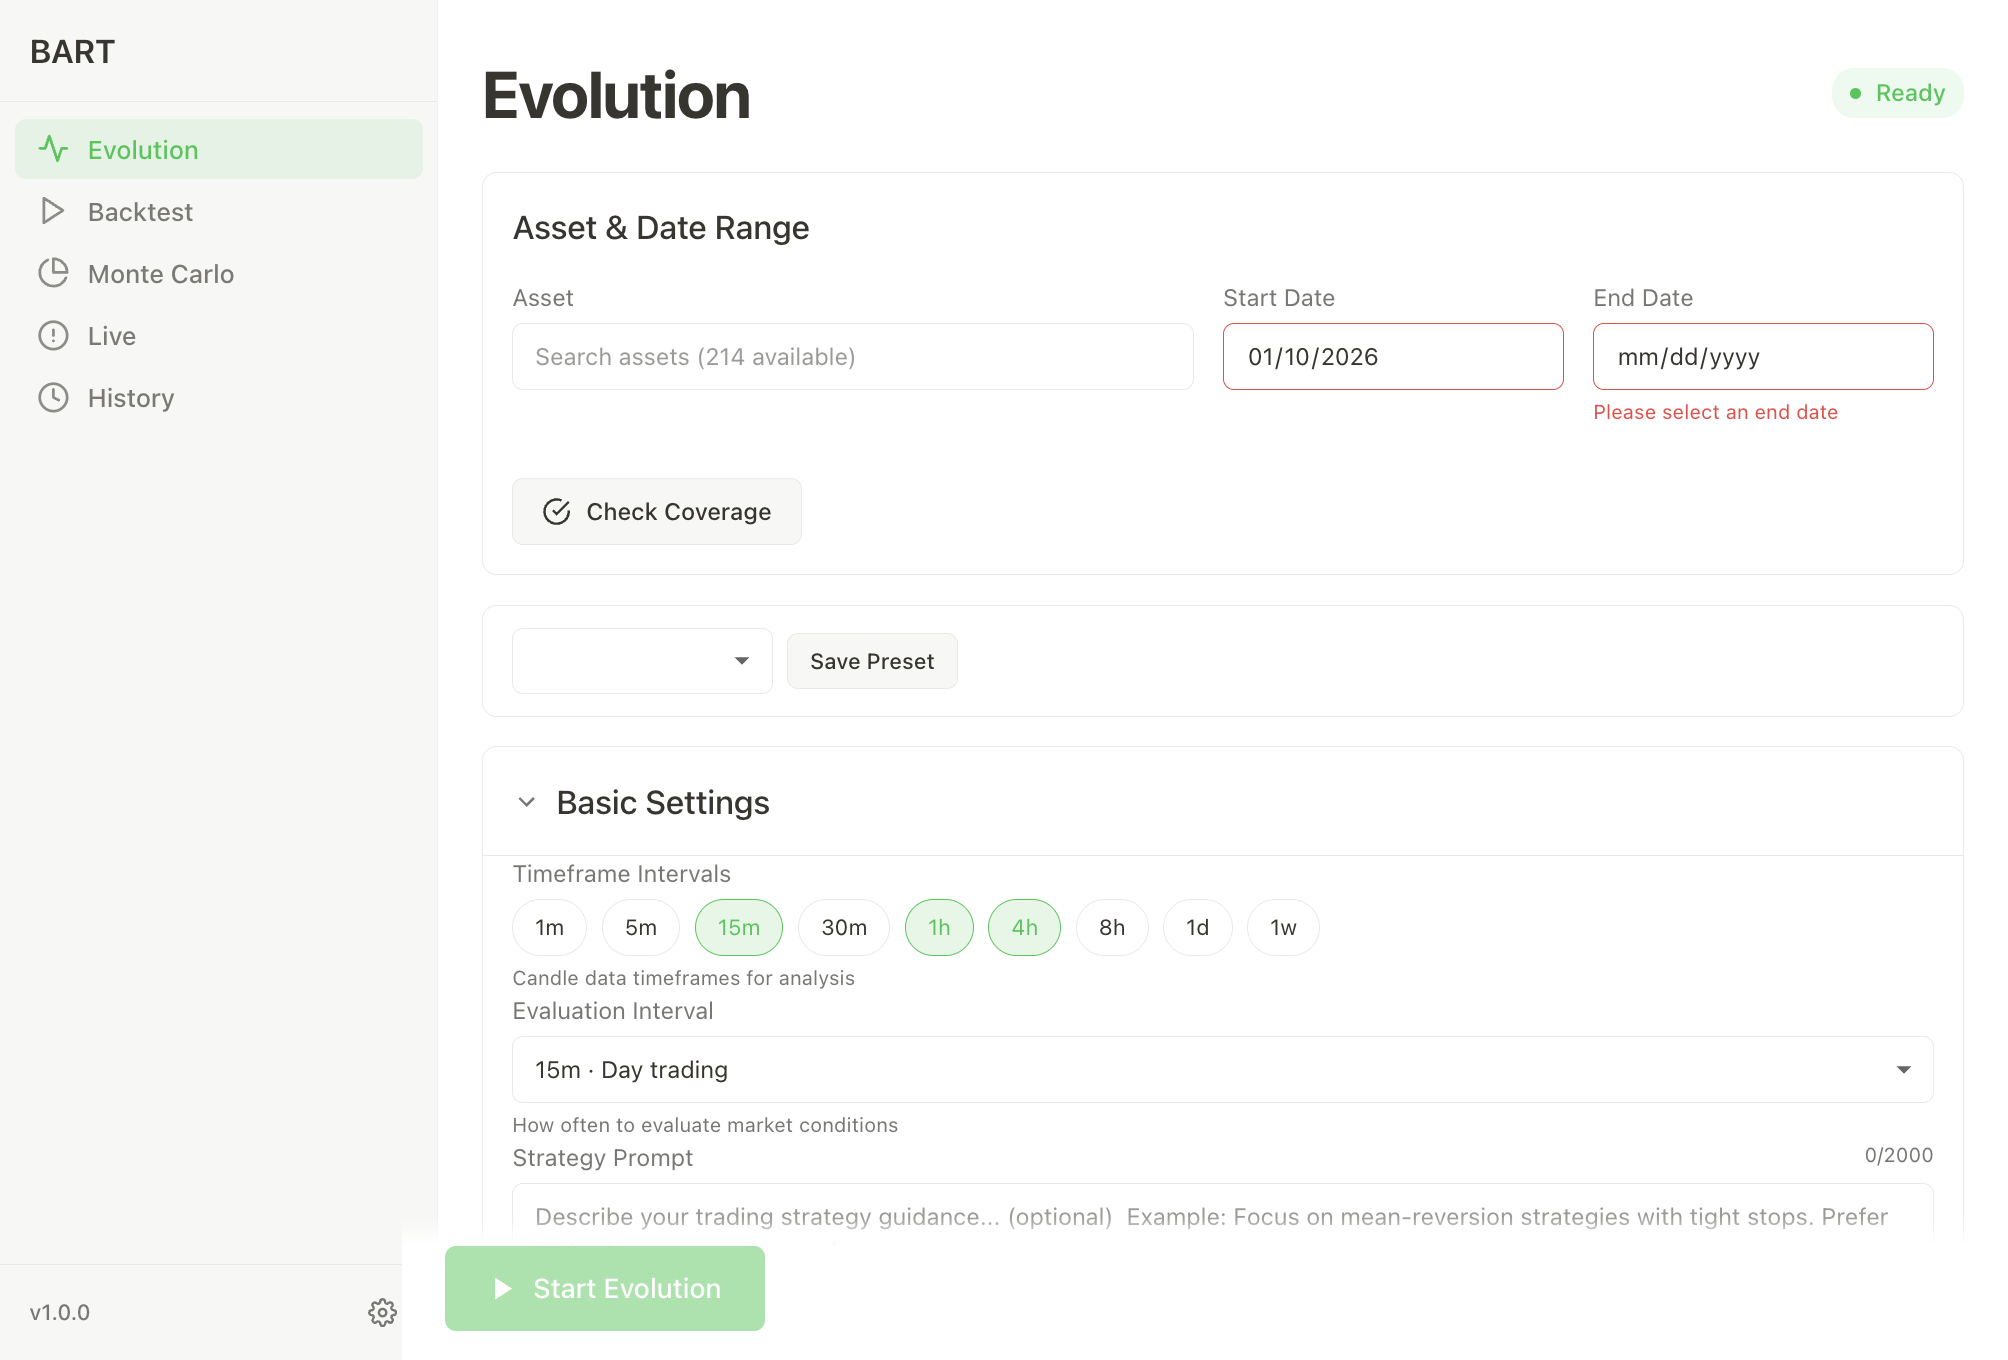
Desktop App
- Go to the Evolution tab
- Configure your run:
- Asset: Select BTC (or another asset)
- Date Range: Last 7-14 days is a good starting point
- Intervals: Keep defaults (15m, 1h, 4h)
- Iterations: Start with 50 for quick runs
- Strategy Prompt (optional): Give guidance like "Focus on momentum breakouts"
- Click Start Evolution
CLI
gopher evolve \
  --asset BTC \
  --start 2025-01-01 \
  --end 2025-01-25 \
  --iterations 50 \
  --prompt "Focus on momentum breakouts"
Quick Start Script
Want to get started immediately? Use the provided quickstart script with a tested configuration.
Step 1: Set your API key
First, get your Gopher Key from gotrader.gopher-ai.com/settings, then set it:
macOS / Linux:
export BART_GOPHER_CODE='gopher_your-key-here'
Windows (PowerShell):
$env:BART_GOPHER_CODE='gopher_your-key-here'
Replace gopher_your-key-here with your actual key. It starts with gopher_ followed by a long string of letters and numbers.
Step 2: Download and run the script
macOS / Linux:
curl -sSL https://raw.githubusercontent.com/gopher-lab/gopher/main/quickstart-tao.sh -o quickstart-tao.sh
chmod +x quickstart-tao.sh
./quickstart-tao.sh
Windows (PowerShell):
Invoke-WebRequest -Uri "https://raw.githubusercontent.com/gopher-lab/gopher/main/quickstart-tao.ps1" -OutFile "quickstart-tao.ps1"
.\quickstart-tao.ps1
This script runs evolution on TAO (Bittensor) with settings optimized for:
- Multi-timeframe analysis: 15m, 30m, 1h intervals
- Good data coverage: TAO typically has reliable historical data
- Balanced exploration: 50 iterations for thorough strategy discovery
Results vary based on market conditions. The quickstart is designed to demonstrate the evolution process with a configuration that works well across different market environments.
What Happens During Evolution
Gopher's evolution loop:
- Generates an initial trading strategy using the Loop Model
- Backtests the strategy against historical data
- Analyzes performance metrics (PnL, Sharpe, win rate)
- Evolves the strategy based on results and learnings
- Repeats until max iterations reached, finding the best strategies
Watch the progress in real-time:
╔═══════════════════════════════════════════════════�════════╗
║ Strategy Evolution ║
╚═══════════════════════════════════════════════════════════╝
Asset: BTC
Period: 2025-01-01 to 2025-01-25
Intervals: [15m 1h 4h]
Iterations: 50
Leverage: 10.0x
Starting evolution...
[1/50] 2% complete
→ Backtest: PnL +3.45% | WR 54.2% | 18 trades
[2/50] 4% complete
→ Backtest: PnL +5.12% | WR 58.3% | 22 trades
...
═══════════════════════════════════════════════════════════
EVOLUTION COMPLETE
═══════════════════════════════════════════════════════════
Total Iterations: 50
Best PnL: 12.45%
Best Win Rate: 65.0%
Best Sharpe: 1.92
Session ID: agent_20250127_143052
Step 5: Validate with Monte Carlo
Once you've found a good strategy, validate it statistically:
CLI
gopher montecarlo \
  --asset BTC \
  --prompt "Your evolved strategy prompt here" \
  --runs 50
Desktop App
- Go to the Monte Carlo tab
- Select your best strategy from the evolution results
- Set number of runs (50-100 recommended)
- Click Run Validation
Monte Carlo runs the same strategy multiple times to assess consistency and robustness.
Step 6: Run Single Backtests
You can also run individual backtests without evolution:
CLI
gopher backtest \
  --asset BTC \
  --prompt "Follow momentum breakouts with RSI confirmation" \
  --start 2025-01-01 \
  --end 2025-01-25 \
  --intervals 15m,1h,4h
Desktop App
- Go to the Backtest tab
- Enter your strategy prompt
- Configure date range and intervals
- Click Run Backtest
Utility Commands
Check Data Coverage
Before running backtests, verify data availability:
# Check coverage for an asset
gopher coverage --asset BTC

# Find optimal date range
gopher coverage --asset BTC --optimal
List Available Assets
See all tradable assets:
gopher assets

# Top assets by volume
gopher assets --top 20
View History
Review past backtests and sessions:
# List recent backtests
gopher history

# Show resumable evolution sessions
gopher history --resumable

# Group by session
gopher history --grouped
Resume Interrupted Evolution
If evolution was interrupted, resume it:
gopher evolve --resume ~/Documents/Gopher/sessions/agent_20250127_143052.session.json
Tips for Better Results
Choose Appropriate Timeframes
| Trading Style | Recommended Timeframes |
|---|---|
| Scalping | 1m, 5m |
| Day Trading | 15m, 30m |
| Swing Trading | 1h, 4h, 8h |
| Position Trading | 1d, 1w |
Ensure Good Data Coverage
- Check the coverage indicator (aim for >90%)
- Longer date ranges = more reliable backtests
- Some assets have more historical data than others
- Use
gopher coverage --asset ASSET --optimalto find the best dates
Start Conservative
- Use default risk settings initially (2% risk, 10x leverage)
- Multiple timeframes (e.g., 15m + 1h + 4h) often work better than single
- Test with paper trading before going live
Live Trading
Once you've found profitable strategies, deploy them to Hyperliquid.
1. Get Your Wallet Private Key
Your Hyperliquid account is tied to your connected wallet. Export the private key from the wallet you use to connect to Hyperliquid:
MetaMask:
- Click the three dots menu → Account details
- Click Show private key
- Enter your password and copy the key (starts with
0x...)
Rabby:
- Click the account icon → More → Export Private Key
- Enter your password and copy the key (starts with
0x...)
Never share your private key! Store it securely and never commit it to version control.
2. Configure via Setup Wizard
The easiest way to configure live trading:
gopher setup --mode live
The wizard will:
- Ask for your Gopher Key or OpenRouter API key (for LLM)
- Ask for your Hyperliquid private key (securely stored in
.env) - Create a
traders.yamlconfiguration file - Set up your trading parameters
Your credentials are saved to ~/Documents/Gopher/.env and never committed to version control.
3. Alternative: Manual Configuration
If you prefer to set up manually:
# Add to ~/.zshrc or ~/.bashrc

# Gopher Key (recommended)
export BART_GOPHER_CODE='gopher_your-key-here'

# Or OpenRouter
export OPENROUTER_API_KEY='your-openrouter-key'

# Hyperliquid private key
export TRADER_PRIVATE_KEY='your-private-key-here'
Or create a .env file (add to .gitignore!):
# .env
BART_GOPHER_CODE=gopher_your-key-here
TRADER_PRIVATE_KEY=your-private-key-here
traders.yaml Configuration Reference
The traders.yaml file configures your live trading parameters:
traders:
  - id: "my-trader"              # Unique trader identifier
    private_key_env: "HL_KEY"    # Env var containing Hyperliquid private key
    capital: 1000.0              # Capital allocation in USD
    asset: "BTC"                 # Trading asset
    model_id: "qwen/qwen3-vl-8b-instruct"  # LLM model for decisions
    eval_interval: 15m           # How often to evaluate positions
    leverage: 10                 # Position leverage
    slippage_bps: 25             # Slippage tolerance in basis points
    intervals: ["15m", "1h", "4h"] # Optional indicator intervals
    indicators:                 # Optional indicator overrides
      - type: "sma"
        enabled: true
        sma:
          period: 50
| Field | Type | Default | Description |
|---|---|---|---|
id | string | required | Unique trader identifier |
private_key_env | string | required | Environment variable containing Hyperliquid private key |
capital | float | 1000.0 | Capital allocation in USD |
asset | string | required | Trading asset (e.g., "BTC", "TAO") |
model_id | string | qwen/qwen3-vl-8b-instruct | LLM model for trading decisions |
eval_interval | duration | 5m | How often to evaluate positions |
leverage | float | 10.0 | Position leverage |
slippage_bps | float | 25.0 | Slippage tolerance in basis points (1 bps = 0.01%) |
intervals | string[] | optional | Timeframe intervals for indicator summaries |
indicators | object[] | optional | Indicator overrides (see Indicators) |
Slippage Configuration:
The slippage_bps setting controls how much price buffer is added to IOC orders to ensure fills:
| Asset Liquidity | Recommended slippage_bps |
|---|---|
| High (BTC, ETH) | 10-25 |
| Medium (SOL, AVAX) | 25-35 |
| Low (TAO, smaller caps) | 35-50 |
Lower values give tighter fills but higher rejection risk on volatile/illiquid assets. The system also uses adaptive slippage (at least 2x the current spread) and retries with escalating slippage if orders fail.
4. Paper Trading (Testnet)
Test your strategy without risking real funds:
gopher live --config traders.yaml --mode paper
Manual overrides (manual mode only):
gopher live \
  --config traders.yaml \
  --mode paper \
  --intervals "15m,1h,4h" \
  --indicators ./indicators.yaml
5. Live Trading (Mainnet)
Deploy with real funds:
gopher live --config traders.yaml --mode live
Live trading uses real funds on Hyperliquid mainnet! Always:
- Test thoroughly with paper trading first
- Start with small capital
- Monitor your positions closely
Query Trade History
View your trading history:
# Table format
gopher trades --limit 50

# Filter by symbol
gopher trades --symbol BTC --since 2025-01-01

# JSON export
gopher trades --json > trades.json
Complete Workflow Example
Here's a complete workflow from start to finish:
# 1. Setup (first time only)
gopher setup

# 2. Check available assets
gopher assets --top 20

# 3. Verify data coverage
gopher coverage --asset BTC --optimal

# 4. Run strategy evolution
gopher evolve --asset BTC --start 2025-01-01 --end 2025-01-25 --iterations 50

# 5. Validate the best strategy with Monte Carlo
gopher montecarlo --asset BTC --prompt "Best strategy from evolution" --runs 100

# 6. Review history
gopher history --grouped

# 7. Start paper trading
gopher live --config traders.yaml --mode paper

# 8. Monitor trades
gopher trades --limit 20
Next Steps
- Configuration - Fine-tune all settings
- Strategy Evolution - Understand how evolution works
- Data Coverage - See available assets and timeframes
- Supported Models - Learn about LLM options